|
|
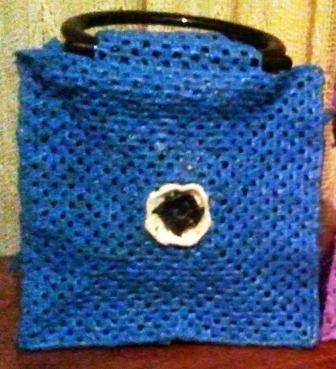
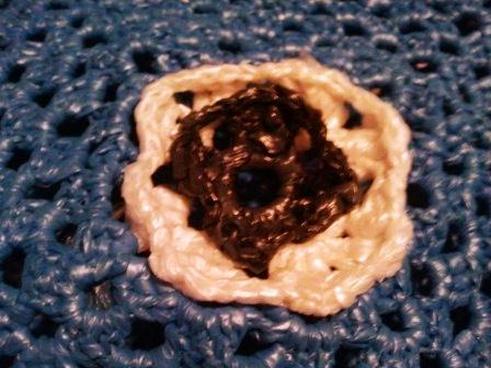
Crocheting a flower can provide a lovely effect. The flower can be the same colour as the rest of the bag or in a contrasting colour, or two colours can be used as in the pictures above. The instructions below cover using two contrasting colours.
Please note: As indicated under the How To tab, UK/AU terminology has now been adopted by using tr for treble crochet instead of the equivalent in US terminology of dc for double crochet.
Using the first contrast colour, crochet the loop and Row 1 as per normal:-
sl, ch 8, sl in first chain to form a loop
Row 1: Ch 2, 2 tr in the loop, ch 3, repeat to the comma 3 times : 3 tr in the loop + ch 3,
sl between the first 2 ch and tr to close the row.
Do not rotate the work.
The next row, Row 1A, will end up sitting on top of Row 2:-
Row 1A: Ch 2, tr into gap between 1st and 2nd stitches, 2 tr into gap between 2nd and 3rd stitches, ch 3,
repeat to the comma 3 times : 2 tr into gap between 1st and 2nd stitches and then 2 tr into gap between 2nd and 3rd stitches + ch 3,
sl between the first 2 ch and tr to close the row.
It is suggested to sew the ends into the work before adding the next two rows.
Using the second contrast colour:-
Row 2: Bend top section of 3 chain forward, sl + 2 ch + 2 tr + 3 ch + 3 tr + 2 ch into first group of 3 chain in Row 1,
repeat 3 times to the comma 3 tr + 3 ch + 3 tr + 2 ch into remaining groups of 3 chain in Row 1 by again bending each top section of 3 chain
forward,
sl between the first 2 ch and tr to close the row.
Do not rotate work.
The next row, Row 2A, will end up sitting on top of Row 3:-
Row 2A: Ch 2, tr between 1st and second stitches, 2 tr between 2nd and 3rd stitches, ch 2,
repeat to the comma 7 times : 2 tr into gap between 1st and 2nd stitches and then 2 tr into gap between 2nd and 3rd stitches + ch 2,
sl between the first 2 ch and dc to close the row.
It is suggested to sew the ends into the work before adding the next row.
Do not rotate work.
Using the colour selected for the overall bag, crochet Row 3 by starting with a slip stitch in a chain section (not a corner chain) after bending the top chain section forward (as for Row 2), then follow the normal instructions continuing to bend the top chain sections forward.
Follow the normal instructions for the fourth and subsequent rows.